
ArgoCD
This article is about Argocd and how to deploy applications in a Kubernetes cluster with Kustomize and the GitOps method.
Kubernetes
A lot of peoples thinks Kubernetes is very hard…

But in fact you just have a few concepts to learn.
In a Kubernetes cluster, everything is Object. Declare your object (Kind) specification and Kubernetes will manage it for you.
All the Object declaration is made with YAML

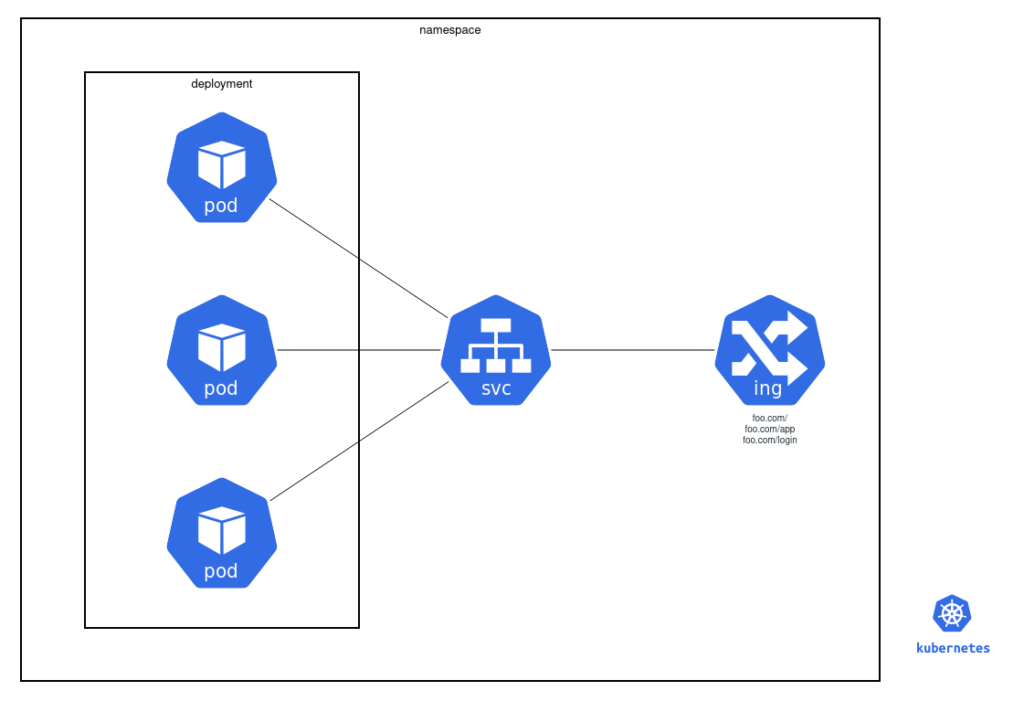
A pod is an object that describe how your application is deployed (docker image name, environment variables, volume mounts, etc..)
Kubernetes will manage relation between objects with labels. For example if you want to communicate between 2 applications, you will create services that will match each application labels and each application can use the service of the other app that will automatically point to the corresponding pod.
To communicate with your Kubernetes cluster, the only thing you need is kubectl and a kubeconfig.yaml file obtained at the cluster creation.
Now you can apply your resource with the kubectl command :
export KUBECONFIG=$HOME/.kube/config
kubectl apply -f deployment.yml
Here is some example of kubernetes objects
All pods are managed with an object called « deployment » :
apiVersion: apps/v1
kind: Deployment
metadata:
 labels:
   app: vote
 name: vote
spec:
 replicas: 3
 selector:
   matchLabels:
     app: vote
 template:
   metadata:
     labels:
       app: vote
   spec:
     containers:
     - image: dockersamples/examplevotingapp_vote:before
       name: vote
       ports:
       - containerPort: 80
         name: vote
Then, to access the pod through the internal kubernetes network we can declare an object of type « service » that will redirect the traffic to all pods that match the label « app=vote »
apiVersion: v1
kind: Service
metadata:
  labels:
    app: vote
  name: vote
spec:
  type: ClusterIP
  ports:
    - name: vote
      port: 80
      targetPort: 80
  selector:
    app: vote
And finally, to expose the service outside the kube, we can declare an object of type « ingress« .
Ingress rules can define rules with a host and a path that neeed to match, so the traffic can be routed to the corresponding service.
apiVersion: extensions/v1beta1
kind: Ingress
metadata:
  name: vote
spec:
  rules:
   - host: vote.domain.com
     http:
       paths:
         - backend:
             serviceName: vote
             servicePort: 80
           path: /
Kustomize
Now we have seen some Kubernetes basics, let’s go further with a tool called Kustomize.
Kustomize is a tools that allow you to declare all your kubernetes resources in a same folder and customize it before apply. It’s like a Helm chart but without complicated templating. With kustomize, you declare your Kube resources in a base folder and define overlays to patch your base resources, add other configMaps or define variables that will be replaced in base.
To explain how Kustomize and argocd works, I’ve created a public gitlab repo to deploy a demo « vote » application.
In the Vote app folder, I have a base folder containing all my application Kubernetes resources, and a kustomize.yml file :
---
apiVersion: kustomize.config.k8s.io/v1beta1
kind: Kustomization
namespace: vote
resources:
- namespace.yml
- db-deployment.yaml
- db-service.yaml
- redis-deployment.yaml
- redis-service.yaml
- result-deployment.yaml
- result-service.yaml
- result-ingress.yml
- vote-deployment.yaml
- vote-service.yaml
- vote-ingress.yml
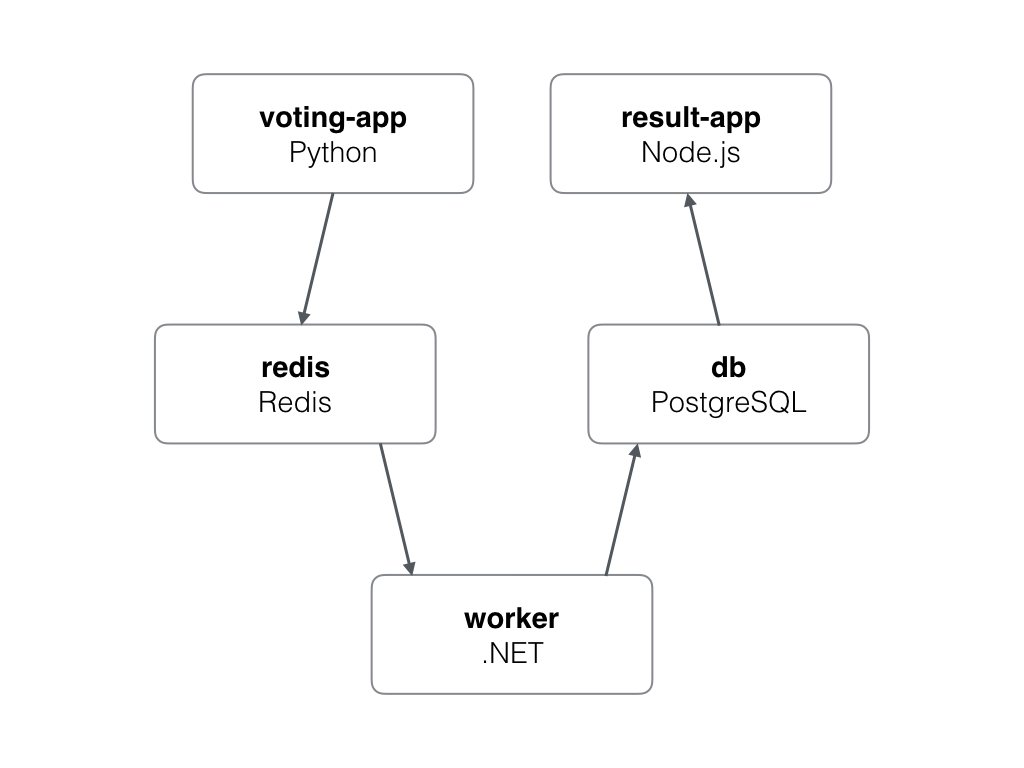
- worker-deployment.yamlThere are lots of resources to be deployed :
- a namespace to isolate my application
- a database (postgres) deployment and service
- a redis to cache the vote result
- a vote web app written in python
- a worker to process votes from redis and store results in db
- a result app to show vote score
And there is also an overlay folder called « dev » which will include all the base resources and add some kustomizations.
---
apiVersion: kustomize.config.k8s.io/v1beta1
kind: Kustomization
namespace: vote
bases:
  - ../base

configMapGenerator:
  - name: apps-config
    behavior: create
    literals:
      - DNS_NAME=demo

vars:
- name: DNS_NAME
  objref:
    apiVersion: v1
    kind: ConfigMap
    name: apps-config
  fieldref:
    fieldpath: data.DNS_NAME

patches:
  - target:
      group: apps
      version: v1
      kind: Deployment
      name: vote.*
    path: patch.deployment.yml
This kustomization overlay add a new configMap « apps-config » with a key DNS_NAME. Then it declare a kustomize variable which will read the configMap to fetch the value of this key and store it.
The variable DNS_NAME will be replaced in the base/ingress.yml file :
apiVersion: extensions/v1beta1
kind: Ingress
metadata:
  name: vote
  namespace: vote
spec:
  rules:
  - host: vote.$(DNS_NAME)
    http:
      paths:
      - backend:
          serviceName: vote
          servicePort: 80
        path: /
Finally this overlay will patch the base vote deployment to change the numbers of replicas
---
apiVersion: apps/v1
kind: Deployment
metadata:
  name: $(DEPLOYMENT)
spec:
  replicas: 2
k3d
To deploy all this stuff, we can use a local Kubernetes cluster.
Thanks to Rancher Labs who released an Open source tool called k3s, we can create Kubernetes cluster in a seconds. K3s is a single binary (<40Mo), written in Go, available for ARM kubernetes distribution.
As it’s a very simple binary, we can run it in docker ! Here comes k3d (k3s in docker)
In one command line, you can create a Kubernetes cluster with multiple worker nodes, a custom registry config, a load balancer already deployed !
k3d create cluster demo -w 3 --no-lb --wait
INFO[0000] Created network 'k3d-demo'
INFO[0000] Created volume 'k3d-demo-images'
INFO[0001] Creating node 'k3d-demo-master-0'
INFO[0001] Creating node 'k3d-demo-worker-0'
INFO[0002] Creating node 'k3d-demo-worker-1'
INFO[0002] Creating node 'k3d-demo-worker-2'
INFO[0008] Cluster 'demo' created successfully!
INFO[0008] You can now use it like this:
export KUBECONFIG=$(k3d get kubeconfig demo)
kubectl cluster-info
Now I can connect to my local cluster :
export KUBECONFIG=$(k3d get kubeconfig demo)
kubectl config use-context k3d-demo
In the demo repo, I skip the load balancer deployment because I need to set custom traefik configuration (insecureSkipVerify = true), So traefik is manually deployed (see the traefik base and dev overlay in the demo repo).
Let’s create the k3s cluster and deploy Traefik + ArgoCD with the script apply.sh
Listing clusters...
Creating kubernetes cluster...
INFO[0000] Created network 'k3d-demo'
INFO[0000] Created volume 'k3d-demo-images'
INFO[0001] Creating node 'k3d-demo-master-0'
INFO[0001] Creating node 'k3d-demo-worker-0'
INFO[0002] Creating node 'k3d-demo-worker-1'
INFO[0002] Creating node 'k3d-demo-worker-2'
INFO[0008] Cluster 'demo' created successfully!
INFO[0008] You can now use it like this:
export KUBECONFIG=$(k3d get kubeconfig demo)
kubectl cluster-info
Exporting kubectl config...
Switched to context "k3d-demo".
--------------------------
         ARGOCD
--------------------------
namespace/traefik created
customresourcedefinition.apiextensions.k8s.io/ingressroutes.traefik.containo.us created
customresourcedefinition.apiextensions.k8s.io/ingressroutetcps.traefik.containo.us created
customresourcedefinition.apiextensions.k8s.io/ingressrouteudps.traefik.containo.us created
customresourcedefinition.apiextensions.k8s.io/middlewares.traefik.containo.us created
customresourcedefinition.apiextensions.k8s.io/tlsoptions.traefik.containo.us created
customresourcedefinition.apiextensions.k8s.io/tlsstores.traefik.containo.us created
customresourcedefinition.apiextensions.k8s.io/traefikservices.traefik.containo.us created
serviceaccount/traefik created
clusterrole.rbac.authorization.k8s.io/traefik created
clusterrolebinding.rbac.authorization.k8s.io/traefik created
configmap/traefik-config created
secret/traefik-default-cert created
service/traefik created
service/traefik-lb created
service/whoami created
deployment.apps/traefik created
deployment.apps/whoami created
ingress.extensions/whoami created
persistentvolumeclaim/traefik-acme created
namespace/argocd created
namespace/database created
customresourcedefinition.apiextensions.k8s.io/applications.argoproj.io created
customresourcedefinition.apiextensions.k8s.io/appprojects.argoproj.io created
serviceaccount/argocd-application-controller created
serviceaccount/argocd-dex-server created
serviceaccount/argocd-server created
role.rbac.authorization.k8s.io/argocd-application-controller created
role.rbac.authorization.k8s.io/argocd-dex-server created
role.rbac.authorization.k8s.io/argocd-server created
clusterrole.rbac.authorization.k8s.io/argocd-application-controller created
clusterrole.rbac.authorization.k8s.io/argocd-server created
rolebinding.rbac.authorization.k8s.io/argocd-application-controller created
rolebinding.rbac.authorization.k8s.io/argocd-dex-server created
rolebinding.rbac.authorization.k8s.io/argocd-server created
clusterrolebinding.rbac.authorization.k8s.io/argocd-application-controller created
clusterrolebinding.rbac.authorization.k8s.io/argocd-server created
configmap/argocd-cm created
configmap/argocd-rbac-cm created
configmap/argocd-ssh-known-hosts-cm created
configmap/argocd-tls-certs-cm created
configmap/argocd-8hgd69k9d2 created
secret/argocd-secret created
service/argocd-dex-server created
service/argocd-metrics created
service/argocd-redis created
service/argocd-repo-server created
service/argocd-server-metrics created
service/argocd-server created
deployment.apps/argocd-application-controller created
deployment.apps/argocd-dex-server created
deployment.apps/argocd-redis created
deployment.apps/argocd-repo-server created
deployment.apps/argocd-server created
ingress.extensions/argocd created
Waiting for traefik LoadBalancer IP...
....................................................
LB IP is 172.24.0.5
Add this line in your /etc/hosts :
172.24.0.5       argocd.demo traefik.demo vote.demo result.demo
Waiting for argocd-server to be ready...
....................................................
Argocd

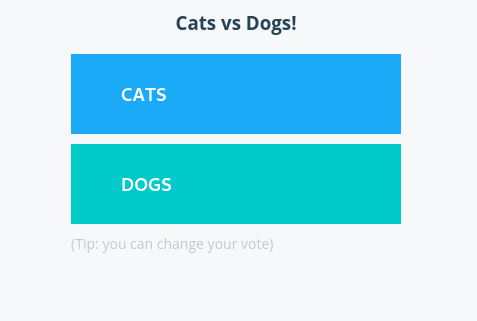
We are ready to deploy the vote application (Cat vs Dog) inside our kubernetes cluster with ArgoCD
Argoproj provides different Open source Kubernetes native tools to manage workflows (Argo), events (Argo-Events), CI and CD (ArgoCD) or rolling updates with A/B testing (Argo Rollout).
ArgoCD concept is that you declare your applications deployment configuration in a Git repo, then ArgoCD will detect modifications in the repo to apply the manifets automatically. Your application deployment configuration can be define as Helm Chart or Kustomize. (Tanka will probably be available soon)
If you push changes in your repo, ArgoCD, which fetch the repo periodically, will detect changes and deploy the application.
If you manually change a configMap or a pod spec in your Kubernetes cluster, ArgoCD will detect it, and re-apply to be conform to what’s in git repo. GitOps is the truth !
To deploy a new application with ArgoCD, a your repo in the « argo-cm » configMap and declare a CRD (Custom Resource Definition) of type « applications.argopoj.io » with the git repo url, the git branch and the path inside the repo.
---
apiVersion: v1
kind: ConfigMap
metadata:
  labels:
    app.kubernetes.io/name: argocd-cm
    app.kubernetes.io/part-of: argocd
  name: argocd-cm
data:
  repositories: |
    - type: git
      url: https://gitlab.com/seuf/argocd-demo.git
apiVersion: argoproj.io/v1alpha1
kind: Application
metadata:
finalizers:
- resources-finalizer.argocd.argoproj.io
name: demo-vote
namespace: argocd
spec:
destination:
namespace: vote
server: https://kubernetes.default.svc
project: default
source:
path: vote-app/dev
repoURL: git@gitlab.com:seuf/argocd-demo
targetRevision: master
syncPolicy:
automated:
prune: true
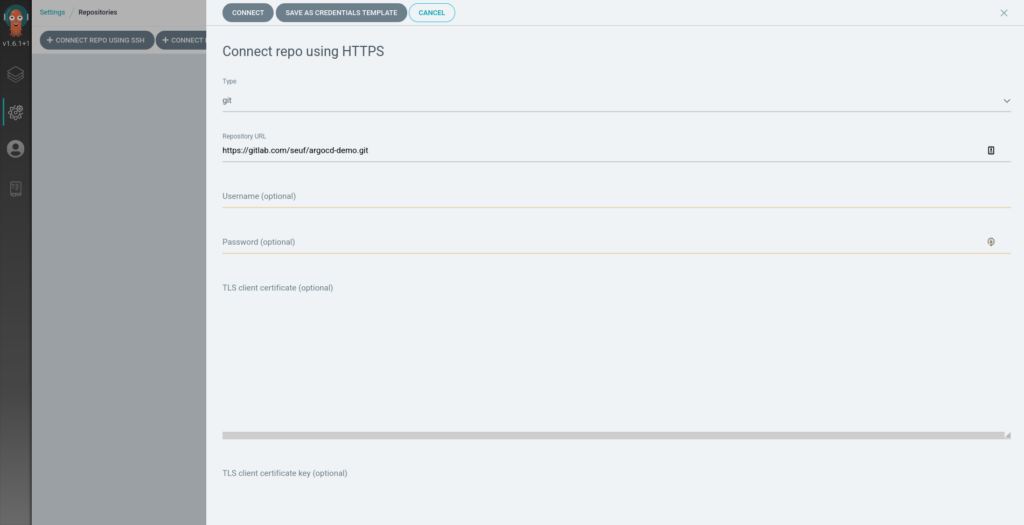
selfHeal: falseYou can also create new applications from the Argocd Web UI.
First, go to ArgoCD settings, in the left menu and select add repository (with https), and fill the form with your repo url and click « Connect » :
Next add a new application (Applications in the left menu + Add new app)
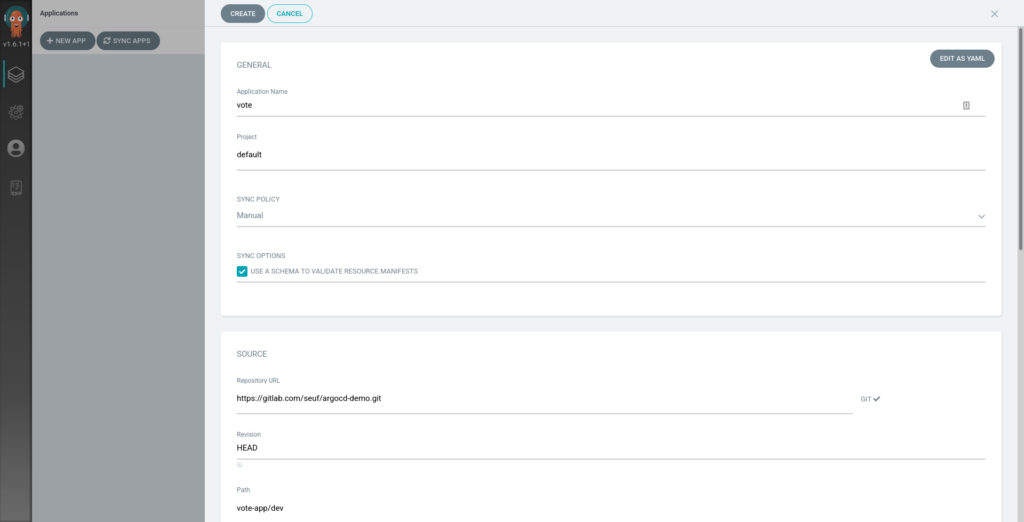
Add a name for you app, select the previously created repo and then the path of your application deployment configuration inside the repo (vote/dev).
You can specify if you want autosync or not (apply automatically on git changes) and if autosync is enabled, you can enable prune (remove old resources not described in git repo) and auto-heal (re-apply automatically on infra changes)
Finally, Click on « Create », your app will be listed in the argocd managed apps. If you click on it, you will see all the app resources and deployment status.
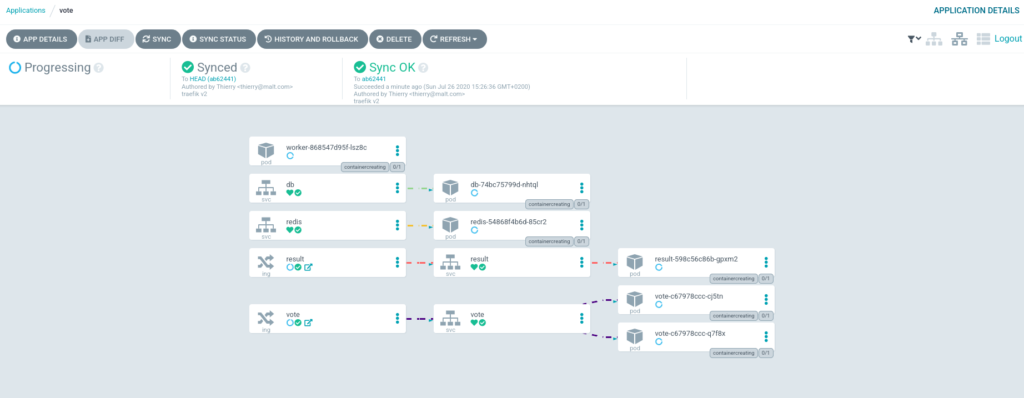
On the top right corner, you can select different views of the deployed resources (network view like the screenshot) or resources view (all the resources, including configMaps, secrets, etc..) or a simple list.
Now if you update the vote deployment configuration in the git repo, Argocd will automatically detect changes and deploy the new manifests. If you have selected « manual sync » during the app creation, you will be able to see the diff between git repo and live manifests and you can synchronize the resources you want !
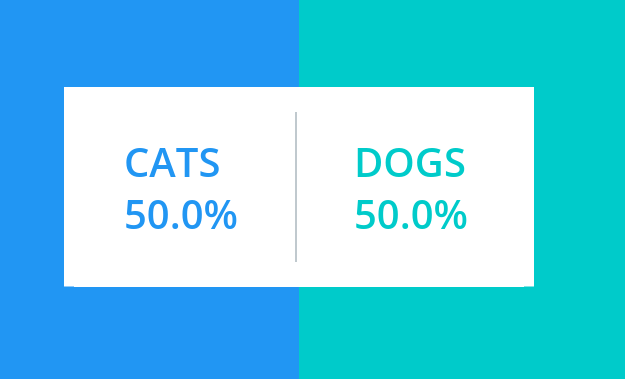
Once all the resources are synchronized you can access the voting app directly through your browser at https://vote.demo and visualize the results at https://results.demo
Conclusion
This article only covered the basics of ArgoCD. There are a lots of features Like Sync Phases and Waves that allow you to order deployment resources. For example you can run a Job to upgrade your database schema before deploying the application.
ArgoCD also provides Notifications to send notifications on slack channels or mails, etc..
Since Argocd v1.6, Argoproj and Weave Flux have worked together to unify their GitOps Engine. You can declare your repo and applications with a simple cli if you want.
This is a CNCF Incubating Project with a lot of active contributors. I’m using it in production at Malt since a year now. I’m sure it will become a standard for many enterprises in a near future.
Hello! The Traefik Team here. Thank you for your blog post! We’d love for you to join the Traefik Ambassador Contributor Community so we can promote and reward your work. Please fill out the Content Contribution form here, and we’ll send goodies soon and share your blog abroad. Thanks! https://info.containo.us/traefik-ambassador-program